<< Previous Page | Next Page >>
Fetch Part 2: Training the Model
In this portion of the tutorial, you will:
- Install TensorFlow.
- Download pre-trained model weights (for transfer learning).
- Train a dog toy finding model.
- Visualize our model's performance live on Spot.
We'll follow this tutorial pretty closely, with slight modifications for data from Spot. We're following this example to demonstrate that most out-of-the-box models are easy to use with Spot. We have included the key Spot-specific tips you'll need along the way.
Installing TensorFlow, CUDA, and cuDNN
There are many, many excellent guides on how to do this. We will cover the basic steps here, but details for different systems are best found elsewhere.
Install NVIDIA drivers, CUDA, and cuDNN
- We will not cover system-specific NVIDIA driver, CUDA, or cuDNN installation here. Use the links above for installation guides.
- You must install CUDA version 10.1 and cuDNN version 7.6.x
- CUDA and cuDNN versions other than this will not work
- Ensure your NVIDIA driver is >= 418.39 to be compatible with CUDA 10.1, as specified in NVIDIA's compatibility tables here
Install TensorFlow
Enter your Spot API virtualenv
Replace my_spot_env with the name of the virtualenv that you created in the [Spot Quickstart Guide](../quickstart.md):
source my_spot_env/bin/activate
If that worked, your prompt should now have (my_spot_env) at the front.
Install TensorFlow
python3 -m pip install --upgrade pip
python3 -m pip install tensorflow-gpu==2.3.1 tensorflow==2.3.1 tensorboard==2.3.0 tf-models-official==2.3.0 pycocotools lvis
python3 -m pip uninstall opencv-python-headless
- Tensorflow likes to install a non-GUI version of OpenCV, which will cause us problems later
- We can safely uninstall it because we already installed OpenCV.
Test TensorFlow and CUDA installation
(my_spot_env) $ python3
>>> import tensorflow as tf
>>> print("Num GPUs Available: ", len(tf.config.list_physical_devices('GPU')))
Num GPUs Available:  1
If this doesn't work for you, you'll need to figure out what is wrong with your installation. Common issues are:
- NVIDIA drivers not working.
- Wrong CUDA version installed (we are using 10.1).
- Didn't install cuDNN or installed wrong cuDNN version.
Install TensorFlow Object Detection API
To make things easy, we're going to use a specific revision of the tensorflow models. More advanced users can download and compile protobufs themselves.
- Download our package with the precompiled files and save it in the
fetchfolder - Unzip it:
- Install the object detection API:
unzip models-with-protos.zipcd models-with-protos/research
python3 -m pip install .- Checked out the models repository at revision
9815ea67e2122dfd3eb2003716add29987e7daa1 - Compiled protobufs with:
cd models/research
protoc object_detection/protos/*.proto --python_out=.
cp object_detection/packages/tf2/setup.py .
python3 -m pip install .
Prepare Training Data
We'll now split our data into a training set and a test set, and then convert our XML labels into a format that TensorFlow accepts.
Partition the Data
We want to hold back some of our data from the training set so that we can test to ensure our model isn't grossly over-fitting the data.
The goal is to organize our data as follows:
dogtoy/
├── images
│   ├── left_fisheye_image_0000.jpg
│   ├── left_fisheye_image_0001.jpg
│   └── ...
└── annotations
    ├── test
    │   ├── right_fisheye_image_0027.xml
    │   └── ...
    └── train
        ├── right_fisheye_image_0009.xml
        └── ...
You could do this manually, but we'll use a script.
- Download the script and put it in the
~/fetchfolder. - Run the script:
cd ~/fetch
python3 split_dataset.py --labels-dir dogtoy/annotations/ --output-dir dogtoy/annotations/ --ratio 0.9
This copies your XML label files into the train and test folders, splitting them up randomly. The script copies just to be extra safe and not delete your painstakingly labeled files!
Create a Label Map
Create a file calledlabel_map.pbtxt and put it in dogtoy/annotations with the following contents:
item {
    id: 1
    name: 'dogtoy'
}
Convert Labels to .record Format
TensorFlow takes a different format than labelImg produces. We'll convert using this script.
- Download the script and place it in the
fetchdirectory. - Run it:
python3 generate_tfrecord.py --xml_dir dogtoy/annotations/train --image_dir dogtoy/images --labels_path dogtoy/annotations/label_map.pbtxt --output_path dogtoy/annotations/train.recordpython3 generate_tfrecord.py --xml_dir dogtoy/annotations/test --image_dir dogtoy/images --labels_path dogtoy/annotations/label_map.pbtxt --output_path dogtoy/annotations/test.recordDownload Model for Transfer Learning
We don't want to train a model from scratch since that would take a long time and require huge amounts of input data. Instead, we'll get a model that is trained to detect lots of things and guide it to detect our dog-toy specifically.
- Make a pre-trained-models folder:
mkdir dogtoy/pre-trained-models~/fetch/dogtoy/pre-trained-models folder.- The TensorFlow Model Zoo has lots of other models you could use.
cd dogtoy/pre-trained-models
tar -zxvf ssd_resnet50_v1_fpn_640x640_coco17_tpu-8.tar.gz
Train the Model
We're almost ready for training!
Set up model parameters
- Make a folder for our new model:
cd ~/fetch/dogtoy
mkdir -p models/my_ssd_resnet50_v1_fpn
cp pre-trained-models/ssd_resnet50_v1_fpn_640x640_coco17_tpu-8/pipeline.config models/my_ssd_resnet50_v1_fpn/
models/my_ssd_resnet50_v1_fpn/pipeline.config and change:num_classes to 1
batch_size to 4
fine_tune_checkpoint to "dogtoy/pre-trained-models/ssd_resnet50_v1_fpn_640x640_coco17_tpu-8/checkpoint/ckpt-0"
fine_tune_checkpoint_type to "detection"
Under train_input_reader:
label_map_path: "dogtoy/annotations/label_map.pbtxt"
input_path: "dogtoy/annotations/train.record"
Under eval_input_reader:
label_map_path: "dogtoy/annotations/label_map.pbtxt"
input_path: "dogtoy/annotations/test.record"
To help keep you on track, here is a checklist:
Train the Model
- Copy the training script into a more convenient location:
cd ~/fetch
cp models-with-protos/research/object_detection/model_main_tf2.py .
python3 model_main_tf2.py --model_dir=dogtoy/models/my_ssd_resnet50_v1_fpn --pipeline_config_path=dogtoy/models/my_ssd_resnet50_v1_fpn/pipeline.config --num_train_steps=20000
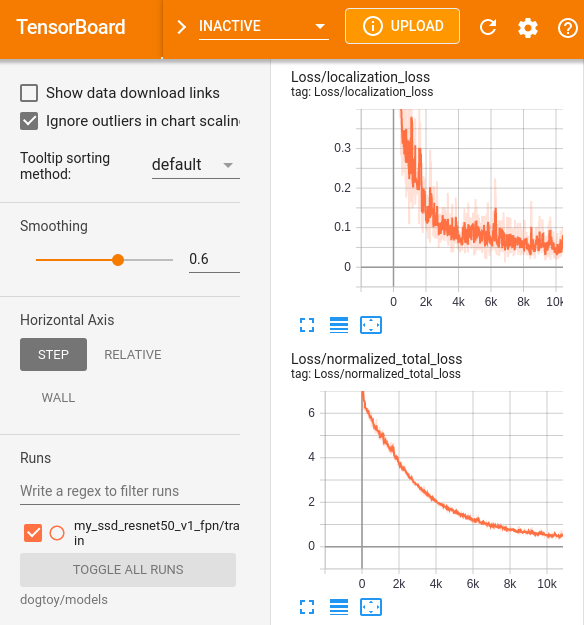
INFO:tensorflow:Step 100 per-step time 0.340s loss=6.323
INFO:tensorflow:Step 200 per-step time 0.352s loss=6.028
INFO:tensorflow:Step 300 per-step time 0.384s loss=5.854
nvidia-smi. In a new terminal:watch -n 0.5 nvidia-smitensorboard to see outputs:source my_spot_env/bin/activate
cd ~/fetch
tensorboard --logdir=dogtoy/models --bind_all
Evaluation During Training
During training, we can evaluate our network’s current state against our test set.- In a new terminal:
source my_spot_env/bin/activate
cd ~/fetch
CUDA_VISIBLE_DEVICES="-1" python3 model_main_tf2.py --model_dir=dogtoy/models/my_ssd_resnet50_v1_fpn --pipeline_config_path=dogtoy/models/my_ssd_resnet50_v1_fpn/pipeline.config --checkpoint_dir=dogtoy/models/my_ssd_resnet50_v1_fpn
Let's break down what this is doing.
CUDA_VISIBLE_DEVICES="-1"Set an environment variable that tells CUDA that no GPUs are available.
- We do this because the training is using all of our GPU memory.
- This forces the evaluation to run on the CPU, where we still have memory available.
- CPU will be slow, but that's okay since it will only evaluate the model once every 5 minutes or so.
model_main_tf2.py --model_dir=dogtoy/models/my_ssd_resnet50_v1_fpn --pipeline_config_path=dogtoy/models/my_ssd_resnet50_v1_fpn/pipeline.config- Same as above.
--checkpoint_dir=dogtoy/models/my_ssd_resnet50_v1_fpn- Tell the script to run in evaluation mode and point it to our training output.
Once this is running, you'll see new charts in TensorBoard that show results from evaluating on our training set, once per 1,000 steps of training.
- These results are more trustworthy because they are from images the network has not seen during training.
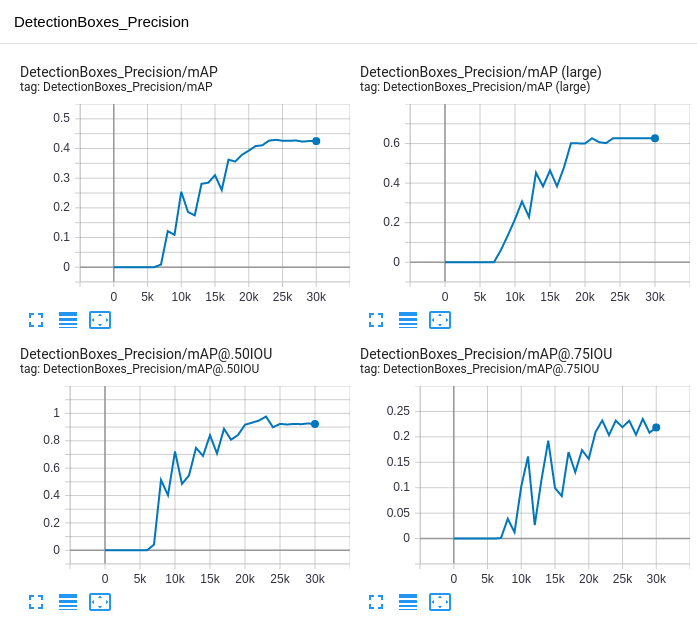
- mAP (mean average-precision) is a metric that describes (a) how much the model's predicted bounding boxes overlap with your labeled bounding boxes and (b) how often the class labels are wrong.
- Take a look at the section How do I measure the accuracy of a deep learning object detector? of this post for a good explanation.
- You can use these graphs as a way to tell if your model is done training.
- Feel free to
^Ctraining if it looks like you're done. Checkpoints are automatically saved.
TensorBoard provides an Images tab that will graphically show you your model's results. Take a look.

Troubleshooting
Failed to get convolution algorithm. This is probably because cuDNN failed to initialize-
You may be out of GPU memory. Often in that case, you'll see
Could not create cudnn handle: CUDNN_STATUS_INTERNAL_ERROR - Run with the environment variable:
TF_FORCE_GPU_ALLOW_GROWTH="true" - You can set the environment variable right before the training line:
TF_FORCE_GPU_ALLOW_GROWTH="true" python3 model_main_tf2.py --model_dir=dogtoy/models/my_ssd_resnet50_v1_fpn --pipeline_config_path=dogtoy/models/my_ssd_resnet50_v1_fpn/pipeline.config --num_train_steps=20000- Try closing items shown in
nvidia-smito free GPU memory. - See the tensorflow documentation for other options.
A checkpoint was restored (e.g. tf.train.Checkpoint.restore or tf.keras.Model.load_weights) but not all checkpointed values were used-
We are failing to load the pre-trained model. Check that
fine_tune_checkpoint_typeis set to"detection"
Use tf.cast instead and then nothing happens.- Double check that your
train.recordfile isn't empty:
ls -lah ~/fetch/dogtoy/annotations/train.record
-rw-r--r-- 1 user users 9.3M Mar  2 14:17 /home/user/fetch/dogtoy/annotations/train.record
                        ^^^^<---- not zero!
Once training is complete, head to Part 3 to take the latest checkpoint, convert it to an online model, and visualize the results.
Head over to Part 3: Evaluate the Model >>
<< Previous Page | Next Page >>