Area Callback Tutorial
We sometimes want the robot to execute a sequence of actions anytime the robot is at the certain location in the map. That is where we can use Area Callbacks. An Area Callback allows the user to associate certain areas with specified actions, such as safety checks at the crosswalks, opening doors, and signaling the environment using lights and sounds.
See the Area Callback documentation for more information about what Area Callbacks are and how they work.
Example: Crosswalk Spot CAM Light
 Below is an example that does the following:
the robot gets to the start of the callback (Area Callback region)
the robot waits and checks its surrounding for the forklift (ML example included as pseudocode), during which it flashes Spot CAM light at 1Hz / 50% brightness
once the robot confirms that the crosswalk is clear of forklifts, it starts crossing the region, during which it flashes Spot CAM light at 3Hz / 80% brightness
the robot reaches the end to turn off the Spot CAM light and proceed to complete the rest of the mission
Let’s take a look at the example to see how that can be done. We will go over some of the important lines in the area_callback_crosswalk.py example.
Initialization
Below two lines lets the user specify the area callback policy at the start and the end of the region.
self.stop_at_start()
self.continue_past_end()
These policies determine the type of behavior that robot will be executing at the start and the end of the area callback region. Available policies are listed below:
continue_past_start()/continue_past_end(): Setting the policy tocontinuemeans that the robot will not pause to complete an action at the start/end of the area callback region.stop_at_start()/stop_at_end(): Setting the policy tostopmeans that the robot will pause at the start/end of the area callback region until the user switches the policy tocontinue. Normally,stopmode will be used to execute an action that does not require robot body lease (i.e. searching for forklift, connecting to bluetooth device)control_at_start()/control_at_end(): Setting the policy tocontrolmeans that robot will pause at the start/end of the area callback region until the user switches the policy tocontinue. The difference ofcontrolmode will be used to execute an action that does require robot body lease (i.e. look both ways, using robot arm to open/close the door). Note thatcontrol_at_<LOCATION>()methods can be used with theblock_until_control()if the robot has nothing to do until it gets the control. Once you are done with robot action, calling thecontinue_past_<LOCATION>()will automatically return the lease back to the robot.
Below is an example for initiating the thread for Spot CAM LED lights. We have provided the LightsHelper class that can be used to run different lighting modes for when the robot is waiting to cross the road versus when the robot is crossing the road. This helper is a context manager that will run a separate thread to control the lights while the main thread continues inside the context.
with LightsHelper(robot, frequency, brightness):
    # Lights will flash here
# Lights will stop flashing here
Begin
We are not using any configurations yet, but this is the place where you will be unpacking user input parameters. TBD.
def begin(
            self, request: area_callback_pb2.BeginAssistRequest
    ) -> area_callback_pb2.BeginAssistResponse.Status:
        # Unpack any configuration settings
        return area_callback_pb2.BeginAssistResponse.STATUS_OK
Run
self.block_until_arrived_at_start() allows the code to stop running until the robot reaches the starting location of the area callback region.
Now that the robot has reached the start location, start the light mode for waiting.
# Actions to be executed at the start of the Area Callback region
with LightsHelper(self.robot, 0.5, 0.2): # start the lights for waiting at the zone
    self.safe_sleep(5.0)
Below is a placeholder pseudocode for where you would insert your ML forklift detection model. Here, you want to place a function inside the with statement that will exit when the road is clear of the forklift so that the robot can proceed to navigate the crosswalk.
    # Wait until the region is clear of forklifts
    while not clear_of_forklifts():
        self.safe_sleep(0.1)
Once you are clear of the forklift, self.continue_past_start() allows the robot to move past the starting location of the area callback region. In short, self.continue_past_start() overrides the self.stop_at_start() policy that was set in the initialization step. Once again, you may want to include any actions that robot should execute after the robot reaches the start and before crossing the Area callback region between self.block_until_arrived_at_start() and this line of code - such as checking for the forklift. As shown below, the example starts the Spot CAM light for crossing the road.
# Actions to be executed while crossing the Area Callback region
with LightsHelper(self.robot, 3, 0.8):
    self.block_until_arrived_at_end()  # block the code until the robot reaches the end
End
To finish the callback, simply return from the callback’s run() method. This callback does not have any cleanup beyond that which is already handled in the LightsHelper context manager.
Running the example with graph nav & recording
For this example, you can either run the area callback client code on your laptop, or on the Spot CORE or CORE I/O.
If you are to run this example on your laptop, you need to have at least release 4.0.0 installed on your laptop. Once installed on your system (or virtual environment), connect to robot’s wifi, then run the callback client code using steps 1-3 above. We recommend that you run your example this way before dockerizing the custom area callback and loading it onto the Spot CORE or CORE I/O.
For Spot CORE or CORE I/O, it is recommended that you dockerize your customized area callback code. The Dockerfile example is included in the look_both_ways and crosswalk_lights folder.
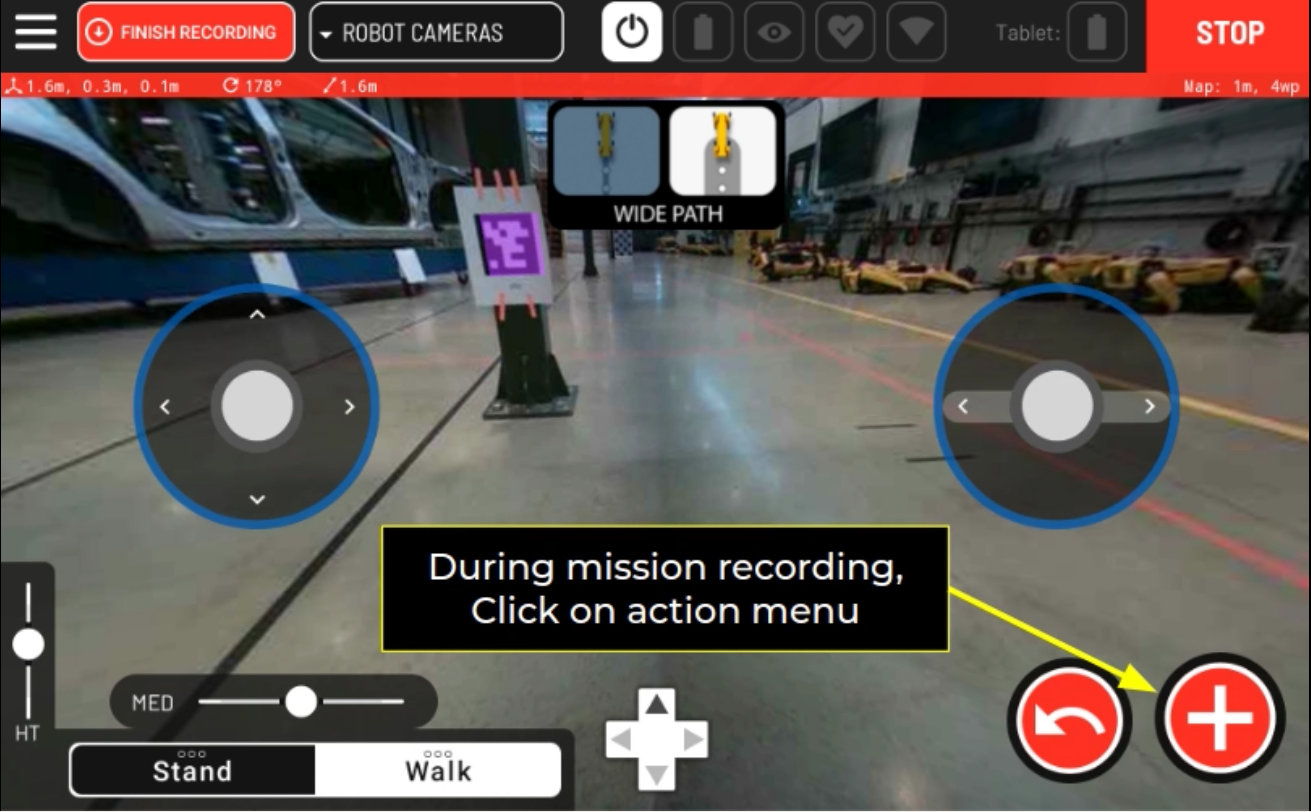
We will use the graph nav as the client, using the map you recorded using the tablet. Adding an area callback region / action works the same way as adding remote mission callback service. During an autowalk, press the red plus button in the bottom right corner of the recording screen.
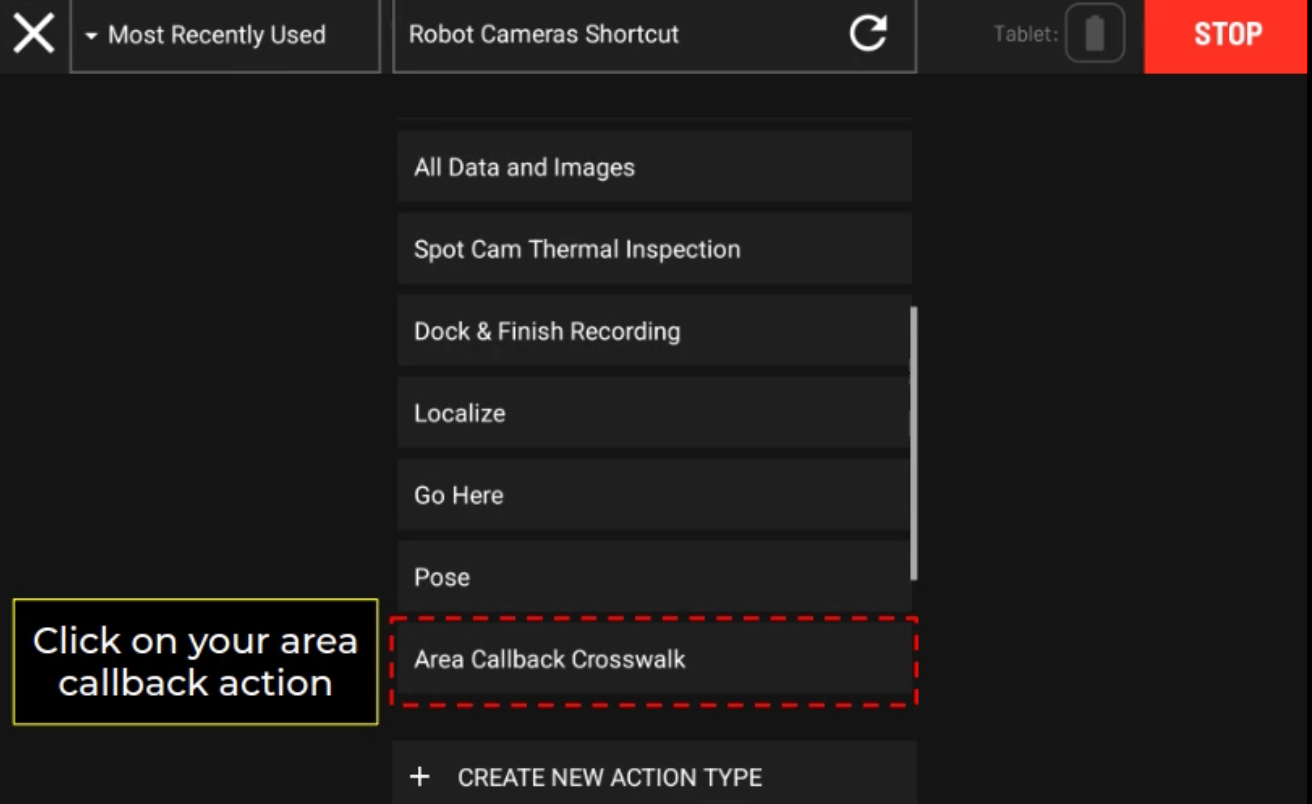
Find and click on your custom area callback action to define your area callback region.
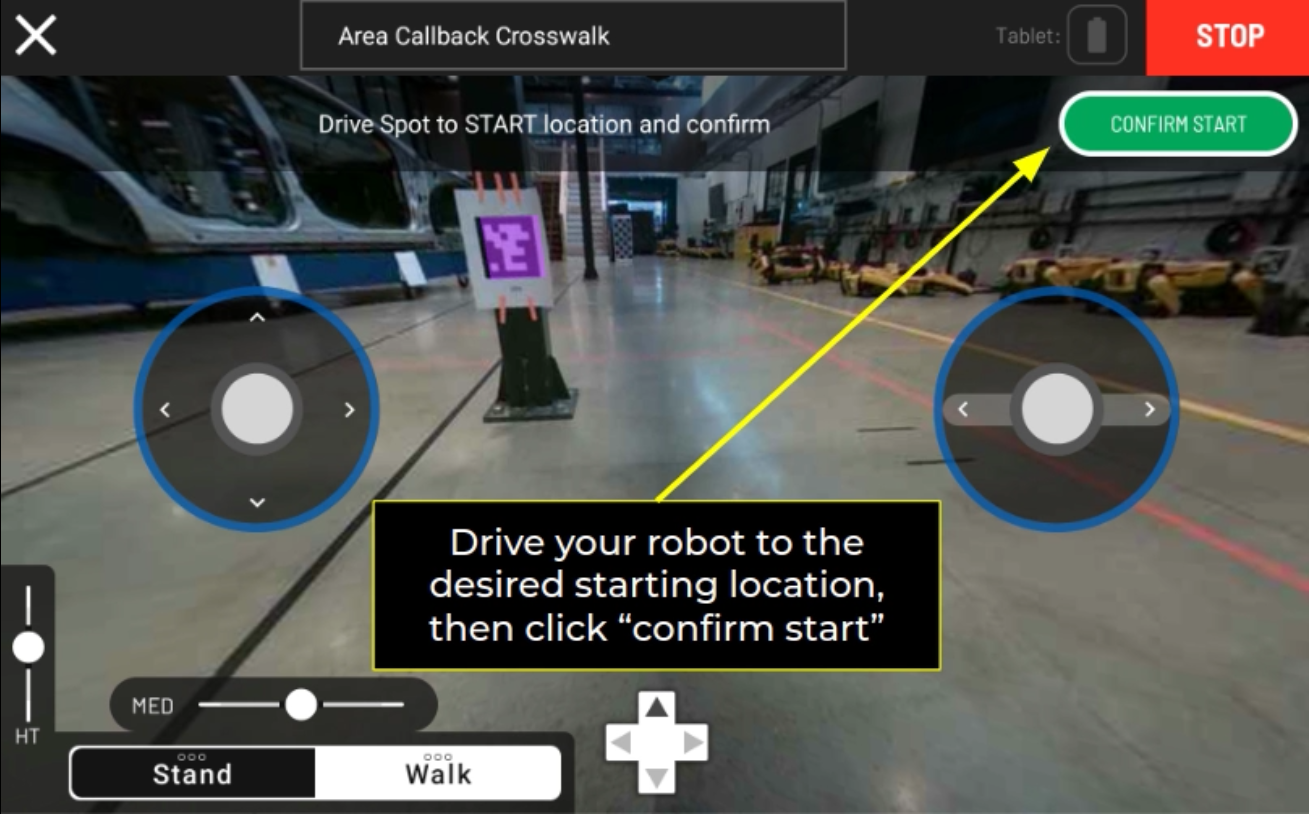
Then, you will see a screen like below. You can still make adjustments to the starting location of your area callback region. Once you reach the starting location, press Confirm Start.
Then, walk your robot to the end location of your area callback region. Then, press Confirm End.

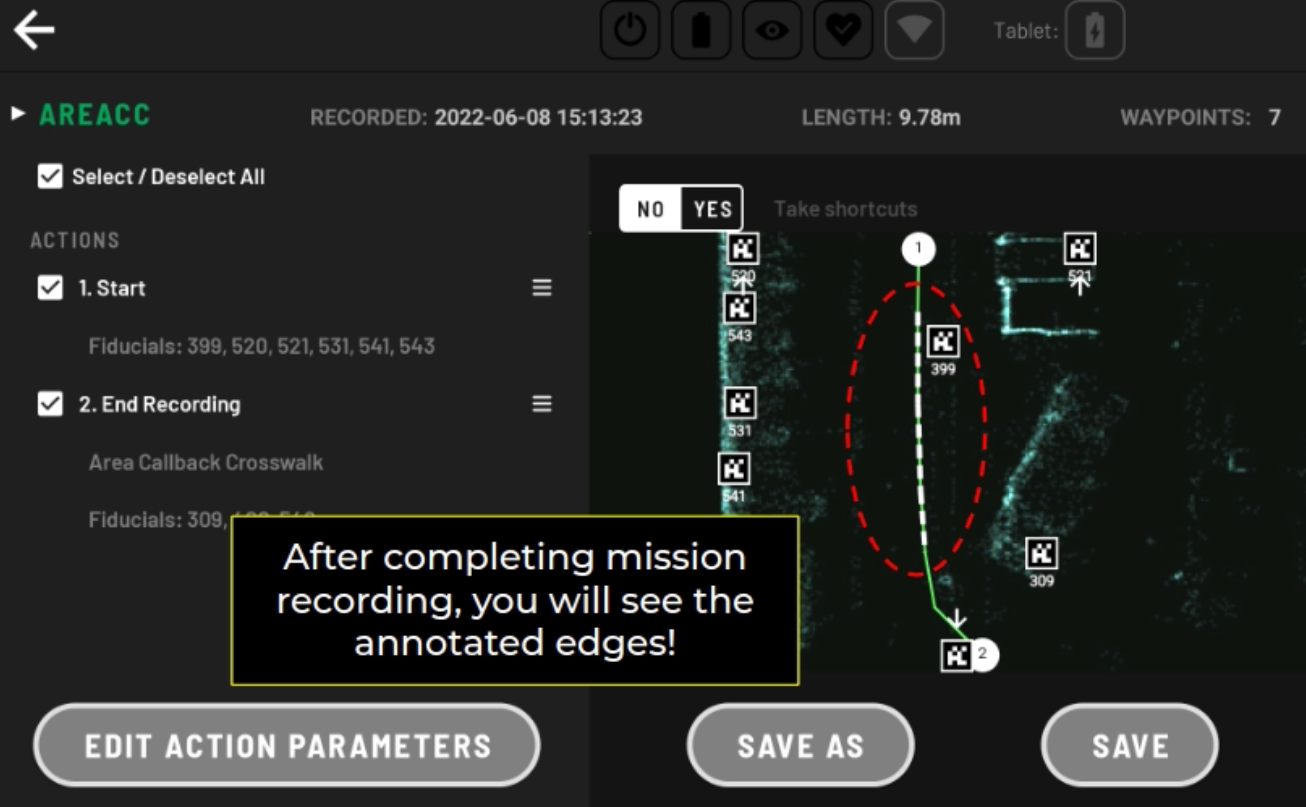
Great! You just finished creating your area callback region into your autowalk mission. You can continue to record your mission, or add another area callback region, or finish recording. Once you finish recording your mission, you will see that the map includes different annotation for the area callback region. As shown below, area callback edges are annotated in dotted lines!